Sample Files Free to Try
See for yourself how easy it is to print high-end images with T-Seps. If you are in a hurry and just want to see what the final seps look like do a test print to see how it all works then this page is for you. Or, if you have never done this type of work before and are not sure if you can do it – this is the easy way to find out. We feel very strongly that anyone can print high-end images with a great set of seps (along with decent screen making and printing technique).

The following images are ones you can download, print out films, burn screens, and see the magic of a great set of seps. These files are complete Photoshop Channel Separations that you can print from Photoshop, Adobe Illustrator or Corel Draw. They are designed to print to a RIP like T-RIP for halftones. BUT if you don’t have a RIP you can also download the Pre-Halftoned Files and print them from any program – no RIP required!

These files were all separated with T-Seps and then minor tweaks were done to the final separations (about ten minutes). These tweaks are necessary because T-Seps uses a “stock” pre-determined color palette and you sometimes need to boost a color here or there and make small nitpick adjustments to your liking. These files have a grayscale calibration bar on each film that was added to the files to help in screen making. This is not part of T-Seps. You can download a copy of that file HERE

These images are great to print and show your customer “look what I can do!” In fact, the Eagle image has space above the main graphic for you to place your name and/or logo. You can do this in Photoshop, Corel or AI and just use one of the colors in the image as part of your new graphic. If you need any help with this just send an email to support@tbiznetwork.com.

Samples Available FOUR Ways
The sample files are available FOUR ways – depending on the graphic program you have and the version. And, all files have registration targets, gray scale, individual separation name, and the job name on each film.

Read how to use each of these file types HERE.

PSD Photoshop File – This file is a typical Channel Separation that can print from Photoshop to a RIP for halftones. If you have Photoshop CS4 or older then you can set the halftone Frequency, Dot Shape and Angle right in Photoshop. This feature was removed in CS5. In CS5 or newer you have to set your RIP for the correct settings.

PDF File – This file is also a Channel Separation but it can print from Photoshop, Corel Draw version X5 or higher and/or Adobe Illustrator version CS5 or higher.

DCS 2.0 EPS – This is an older format that allows you to take a Channel Separation in Corel Draw X4 or older and/or Adobe Illustrator CS4 or older to print.

Pre-Halftoned Files – These files are PNG files and there is one file for each color. Each file is pre-halftoned. You simply need to open/import or place each file one at a time into your favorite graphic program and print. Use the highest photo quality setting when printing to an inkjet printer to get good density on the films..

Important Display Details
For the images to display correctly in Photoshop with “dot gain applied” you MUST read the Photoshop Setup section below the sample files at the bottom of this page. It tells how to adjust the Color Settings feature in Photoshop for the proper display. The Channel Header in the Photoshop files have the recommended print order, mesh count and Pantone color. Please try to NOT deviate from these details. If you are new to this type of printing the high mesh counts may be new to you.

There is also a bug in Photoshop (most versions) where typical “channel separations” don’t display with dot gain applied (critical). The images will show up dull and flat when you open them. There is an easy fix for this and you much check out the Important Display Settings page here for details.

Foreign Users Note: The Channel Header has the mesh count in inches. You will need to convert this to centimeters.
230 mesh in inches = 77 mesh cm
305 mesh in inches = 120 mesh cm

Outputting Films to a RIP
For best results use 45 to 55 LPI Frequency with an angle of 25 degrees for all colors and dot shape of ellipse.

Samples Include Original RGB
We feel it very important to include the original RGB with the Photoshop file samples. We noticed our competitors do not include it. Without the original RGB you really have no way to determine how well the separation process did. The files sizes for our samples are much large with the original RGB but it seems a waste to simply give you separation samples with no reference to the original artwork.

Will the Separations be Dead On?
The separation samples will be very close to the original. But, keep in mind that we are trying to keep a file to six colors (in most cases) that print with standard off-the-shelf plastisol ink and not CMYK. This means the seps will be pretty close to the original but there might be slight subtle differences – that have no effect on the detailed bright look of the final print.

Simulated Process Color

This will be a good sample to show customers. Flash cure the underbase and print everything else wet on wet and watch it pop. This job is Simulated Process Color. It has a black sep for light shirts. There is also an alternate underbase white sep that you should use if printing on any bright colored shirts (where the shirt needs to be blocked from coming through).

Specs:  Six-colors on light or dark shirts. Works best on 100% cotton.  Print on Manual or Automatic.  One Flash on dark shirts.  Mesh: 195 to 230 underbase. 305 colors.
Download PSD Photoshop File (55mb)
Download PDF File (78mb)
Download Pre-Halftoned 45lpi individual PNG Files (76mb) 
PDF File Included

Simulated Process Color

This is a great print. It prints easy and is very forgiving and will be a great sample to show customers. Flash cure the underbase and print everything else wet on wet and watch it pop. Make sure to hold all the small dots on the films on the screen. This job is Simulated Process Color.

Specs:  Six-colors. Works best on 100% cotton.  Print on Manual or Automatic. One Flash.  Mesh: 195 to 230 underbase. 305 colors.
Download PSD Photoshop File (25mb)
Download PDF File (66mb)
Download Pre-Halftoned 45lpi individual PNG Files (34mb) 
PDF File Included

Simulated Process Color

This image shows the power of having us separate spot color images. We do a lot of separations for printers who print for racecar drivers. Many of these images are created in a vector program that we then separate.

This image was built in Corel Draw (it could have just as easily been built in Adobe Illustrator). OK, you could have separated it in Corel but with the gradations and the fact that you need an underbase and highlight white make that much harder.

This sample has two underbase versions. One is much heavier for bright colored shirts like neon that need to be covered more. And, there is a black sep for light shirts but you don’t print it on black shirts. The final print will be six colors for both light and dark shirts.

Specs:  Six-colors on light or dark shirts. Works best on 100% cotton.  Print on Manual or Automatic.  One Flash.  Mesh: 195 to 230 underbase. 305 colors.
Download PSD Photoshop File (10mb)
Download PDF File (60mb)
Download Pre-Halftoned 45lpi individual PNG Files (9mb) 
PDF File Included

Screen Printing Tips
Is is very important to realize that if you are new to burning halftone dots and doing high-end prints – it is not the same as using 110 mesh for all jobs. You will need to invest in 230 and 305 mesh (if you are an international user on the metric system, 230 is the same as 90cm and 305 is the same as 120cm). And, you will need to adjust your exposure times much lower. To learn more about making the move to high-end printing, please take time to read the article on High-End Printing Techniques.
If you have trouble burning halftone dots that will have an effect on the final print. Download the Halftone Test File from the High-End Printing article and burn it and see if you can hold down to a 5% dot.

Each film or separation in the sample files has a small grayscale on it. You need to work hard to hold the 5% dot on the grayscale. Download a copy of this file HERE for your own use on seps
you do with T-Seps.


Photoshop Setup
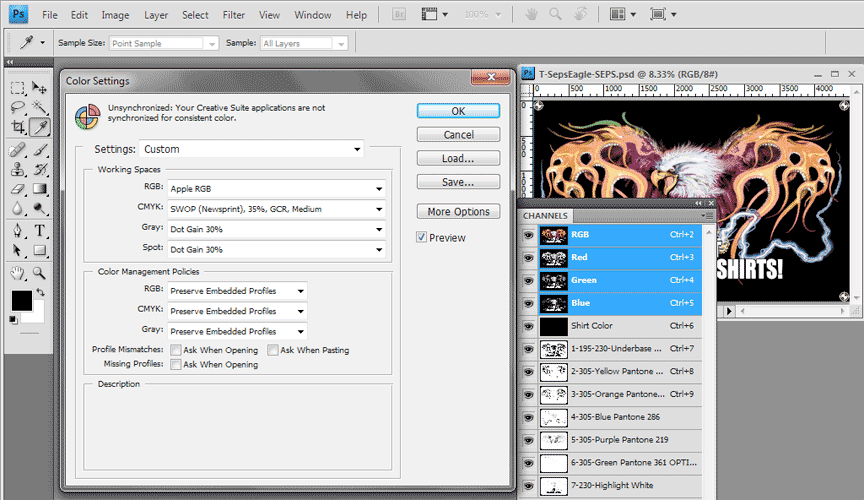
Photoshop is setup out-of-the-box to display channel color separations as if they were to be offset/litho printed. These settings are NOT correct for screen printing on garments. If you don’t have the correct Color Settings in Photoshop then the Photoshop files with channel separations will display dull on the monitor. It is very important to display color separations the way they will print at the press. That way you will know before you ever print films or burn screens how the image should look.

There is a “soft proofing display” bug in some versions of Photoshop that don’t allow it to display “channel” separations with dot gain applied. If the sample files look dull in Photoshop read more HERE.

If you look at each Channel Option you will notice the Solidity (Opacity of the color) is set to 5% on most channels. Do NOT change this setting. This is the opacity of most plastisol ink when printed on dark fabric with no underbase. This setting helps Photoshop display the image the way it will print. Changing this number will brighten the print but it will have NO effect on the final film output.The Color Settings changes are simple. Go to the Edit menu and then Color Settings. Under the Working Spaces menu set the RGB window to Apple RGB. Trust us on this. Even if you are on a Windows computer, this is the standard monitor profile for viewing images. In the Gray and Spot windows set the dot gain to 30%. Do not worry about the CMYK setup window at this point. Photoshop remembers these settings when you say OK.

Print Friendly, PDF & Email
Share
Translate »