Over the years I have learned that one of the major secrets to good screen printing is good color separations. As you become a better printer, it doesn’t take long to learn that in most cases if the separations are done correctly, the print looks great. Yes, yes, you need to use properly tensioned screens, good press setup, proper ink viscosity, etc. – but it all starts with color separations.
This article lists a few quick tips for better separations and art output which leads to better prints. In order to fit this in the allotted space, many tips are brief suggestions that will require referring back to your software manual to figure out. Others are just good nuts-and-bolts suggestions that can make or break a set of seps.
Corel Draw Program Tips
Vector based programs like Corel Draw, Adobe Illustrator and Macromedia Freehand are generally used for spot color images or images with a hard edge and more of a cartoon look. The funny thing about printing shirts is that sometimes spot color images where colors touch colors are often HARDER to print than photo realistic images made up of halftone dots. Here are some vector based program tips.
Note: Click on images for larger view. Click to close.

Spend time on trapping.
When printing spot colors, any out of registration will show up as gaps between colors. If your “films” are output on a laser printer, they many never line up. Trapping is the overlapping of darker colors (like black) on top of undercolors. A trap can be as small as 2 points for shops that can hold tight registration, or as big as 6 points for simple images on low-end equipment. If you spend time adding traps, images will appear to be in register when they are not.
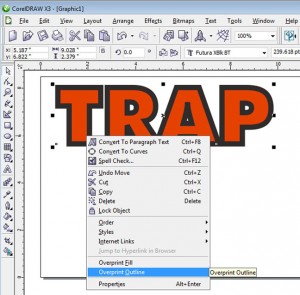
A trap is generally done by adding an outline/stroke to undercolors (other than black) to make them slightly fatter. See figure 1. I will cover this in detail in a future article but for now, it is as simple as selecting and object and holding down the right mouse and selecting “overprint object”. See figure 2. If you gave the text a six point outline then the trap will be 3 points. Easy.
In order to have a trap print out of Corel correctly you need a printer with postscript or a software rip. Trapping happens in the rip during out put.
Allow for Dot Gain.
If using halftone dots or tints of color in an image, when output, these areas are made up of small dots called halftones. When you print a halftone dot, it will grow in size 30% to 50%. You need to allow for this by using a lower percentage tint in shading areas so when it is printed it will look correct. What looks great on the monitor will look much darker when screen printed. Think light.
Use custom registration targets.
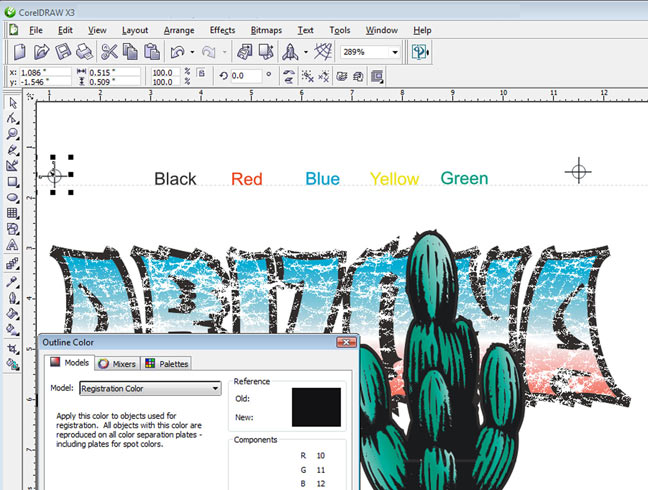
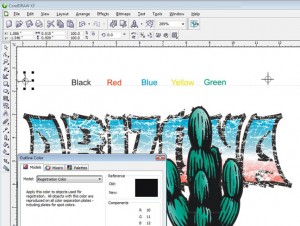
The “stock” registration targets in all programs are generally too small and you don’t have any control over their placement. Make your own custom targets and assign them a color of “Registration Color”. That means they will print on each separation.
At the same time, put the name of each color on the top of the file using the same exact spot colors you use in the file. This way your films will not only have a nice solid registration target for each film but the film will have the exact ink color of that film. See figure 3.
Scan line art at high resolution.
When scanning line art, scan at resolutions of 800 to 1200 dpi in order to have your tracing program like Corel Trace give you a much more accurate bitmap to vector conversion of the image. If you scan at the default scanner setting of 72dpi you will have a very jagged edge when you take the image to Corel Trace.
Choke underbases for better registration.
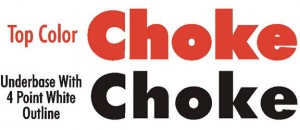
When printing on dark shirt colors, you need a base plate of white. This is generally the entire image converted to one color. For better on-press registration, you should make the underbase from 2 to 4 points “skinnier” – the opposite of a trap. See figure 4.
Soft underbases print easier.
Some images that are solid spot colors need a solid white underbase. Other images that have more shading and gradations, print easier and feel better if the underbase is actually halftone dots. Do this by making the underbase plate a 60% tint of black and then output it as halftone dots.
Improve output – vellum or laser acetate
If using vellum or laser acetate to burn screens, try pre-shrinking the blank pages by running them through the laser one time BEFORE imaging them – to improve registration and minimize shrinkage. Inkjet printing is obviously a better choice for perfect registration and much better films.
In order to really burn a small halftone dot you need dense black on your vellum or laser acetate. This is why much of the screen print world has gone to inkjet printers with software rips because the black is much denser and there are no registration issues.
But…. if you all you have is a laser printer then make sure to spray your vellum or laser acetate down with a “toner black” or stock sprays that made the toner darker.
Specify details, mesh, sequence, etc.
Too many times you do a nice set of films only to have the colors reversed on press or someone not in the know making decisions. If you “built” the separations then YOU know how you think it should be printed. Don’t be shy about dictating mesh counts, color sequences, ink colors and more, AND place this information on each film.
This has been short but don’t let short lead you to believe there isn’t much meat. If you do good trapping and choking and watch how you use halftone dots, you will save money and time at press.


