Stop! Don't put this article down just because you a few years of experience. I teach beginners who can print better with ten minutes of instruction than many printers with years of experience. This article is written with the beginner in mind but take a few minutes – read this short article – and maybe there will be a tip or two to make even an experienced printer better. Why not.
Where Do You Start
The time has arrived. You just spent $15,000 on equipment and you have made a s screen. Now what do you do? What if you ruin a shirt? What if the ink washes off? What if the customer isn't happy? What if you put the print in the wrong location? Maybe this wasn't the business you wanted after all. Traumatic, isn't it!
Fortunately, you'll get over it – but these are the questions and problems that face beginning printers.
This article is about some basic fundamentals of making a print. These are things that beginners AND experienced printers need to know. Make sure your existing printers read this article. How many times has a printer told you how many years he has only to not be able to produce a salable shirt. Just because they have the title "screen printer" doesn't mean they are one!
The Screen
For the purpose of this article we will assume you have a screen made using the correct mesh. No, 110 (43cm) monofilament doesn't work for every job. You need to use the correct mesh count to have a good print. Although mesh count is an entire topic, for now let's assume you are doing a simple three-color print on a light shirt. I would use a 160 (61cm) to 180 (70cm) monofilament mesh with either very well made wood frames that have been purchased with the fabric already attached (prestretched) OR I would use a metal retentionable screen that I had brought to the proper tension a couple of times to get the fabric very tight. I choose the 160 to 180 because I want to lay down a little less ink since this is a multi-color job AND in doing so I will not have to flash cure between colors. In fact I can print this job wet-ink-on-wet-ink. Trust me!
I would also have used a dual-cure photo polymer emulsion as my stencil since they can be used with only a single coat on each side and they hold up well, yet reclaim easily.
Press Set-up
Square the Screen to the Shirtboard The screen needs to be placed on the press and squared to the shirtboard. This is as simple as placing a t-square under the frame and looking through the screen to square the image on the frame to the edge of the board. Now when you make a print it will be straight to the board.
Multi-Color Print Sequence
When printing multi-color prints on light shirts you generally print the lightest color to darkest color OR the smallest print area to the largest area. This sequence, along with the right ink viscosity will help minimize ink picking up on the screen bottoms. This is called build-up and is a common problem in multi-color printing. The easiest way to line-up screens on a multi-color print is to make a print of the outline or main color and just line-up the other screens to the print. Sure you may get a little ink on the bottom of the screen but guess what? It will wipe right off.
Adjust the Off-Contact Distance
The screen MUST be set to sit slightly off the shirtboard. This is called off-contact printing and is how all good printing is done. Some presses have adjustments for this. Others will need to have the screen shimmed from underneath. Either way, you may need to put a thin piece of cardboard under the edge of the frame so it will hit the shirtboard as the screen comes down. This may seem unorthodox, but again, trust me. You need to keep the screen from 1/16" to 1/8" off the shirt and no matter how well made a manual press is, the tip of the screen is going to move downward when you get to the end of the stroke and nothing is going to keep it off the board but a simple shim.
The Ink
This is one area where there is a lot of confusion. The ink manufacturer told you that the stuff in the can was "Ready for Use" (RFU). That means just slop it in the screen and "pump up" to make a print. RFU is one of the greatest lies ever told.
Don't Be Afraid of Additives
Most ink on the market it a little too thick to print easily by hand. It generally needs a slight amount of reduction – thinning – to make it work better. Thinning does not mean making it softer so I am talking about adding a curable reducer rather than a "soft hand" additive. A small amount of reducer will make the ink more workable.
Thin Some Colors More Than Others
Since our test job is a three-color print we will thin our lightest colors a little more. This will generally be the FIRST COLOR YOU PRINT and it needs to penetrate INTO the garment more than the others so you won't pick it up on the bottoms of the other screens. If black is our last color, we can thin it less. It needs to lay on top of the other colors and will blend in with the undercolors if it is too thin.
Stir the Ink First
Plastisol ink tends to get a little thicker or "body up" when it isn't in use so you should ALWAYS STIR THE INK BEFORE YOU THIN IT. By stirring the ink you will find out if it really needs thinner. I prefer an ink that is smooth and creamy to one that is so thick that you break the stick trying to stir it.
How Much Ink to Use
No matter what I tell you here, no matter how little ink you put in the screen, some people are destined to make a mess. I have had printers who would never get a drop on them and have the screen full of ink – and others who got ink on them by just looking at the press. You are better off putting a small amount of ink across the back of the screen. You need enough to make a number of good prints without running dry, but not so much that when you print it all rides up on the squeegee handle. It is much easier to put more ink in a screen and harder to take the excess out!
What Squeegee to Use
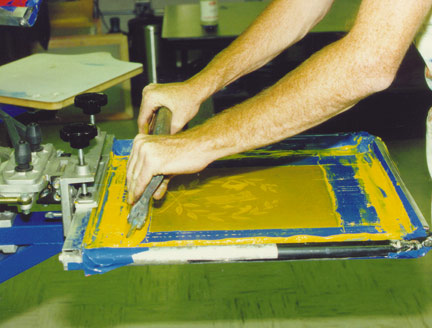
This is another debatable item. The rage now is a triple durometer squeegee that has a harder center around a softer outer edge. These actually do give you more control, especially if you have a lot of strength and try to flatten the blade as you make the print. (No, you really don't want to flatten the blade.) The realities are that you could pick up an "old fashioned" medium hardness blade with a sharp edge and make a great print. Notice that I said sharp edge. A sharp edge shears off the ink cleanly and will make dd a much sharper print than a dull edge blade. If you are a messy printer, you should use the wider 5" handles. These will help keep your fingers out of the ink.
How To Hold and Move the Squeegee
Top Grip
Another debatable area. A lot of printers use the standard "two-hand, top grip, pull towards you" stroke. While this works good, it can cause some problems if printing all day long. Not only will the tips of your fingers and thumbs be sore (and maybe numb!) you may also feel tenderness in your wrists. What you are getting is a repetitive motion disorder known as Carpal Tunnel Syndrome.
Some people can print all their lives and never get this. I am one of them. Others print only a few hours and have a problem. To minimize this problem you should use one of the special ergonomic squeegees that force you to hold your hand wider. You can also pad the handle with foam and tape or purchase the new squeegee pad made specifically for this industry. Carpal Tunnel is a very real disorder that should not be ignored.
Side Grip
This technique moves the strain from the center of your wrist to your forearm muscles. Simply hold the squeegee by the side and pull it towards you. This works great if you are short (aren't all manual presses designed for tall people?), although my son, who is 6'2" loves this stroke. You can actually get great pressure when printing with thick inks.
Push or Pull
Another area of individual preference. Pulling the squeegee towards you is the standard method, but pushing it away from you is really a lot easier. When pulling the squeegee you use more of your wrists and shoulder muscles. When pushing, you use more of your body weight to push the squeegee. You push it but don't change the way you hold it or the angle of the squeegee. This stroke works best with thinner inks and it will take a little getting use to. Actually you can get high production with this method and you get into a little rhythm with your body leaning into the print. It is a much less fatiguing stroke on long jobs!
How Many Strokes Do You Do?
Does it take three strokes in both directions to "work" the ink in to the garment? I'd like to see the print! You really don't have to work the ink into the garment. Just print the shirt with ONE – or maybe two strokes. If you must use two strokes for better coverage DO THEM IN THE SAME DIRECTION! If you have to do two or three strokes then maybe your ink is too thick and it is not flowing good through the screen. Try thinning it down a little and see what happens.
How Much Pressure to Apply
If your ink is too thick then you have to apply lots of pressure to get the ink through the screen. This excessive pressure spreads the ink and causes shadowed, uneven prints. If the ink is the right thickness (viscosity) you should be able to use medium pressure with one stroke and have a GREAT print. When printing on dark shirts you will find that excessive pressure drives the ink too deep into the garment and it actually isn't as bright as when you lighten up a little.
What to do at the end of the stroke?
There are three options here. You can either pull the squeegee all the way to the end of the frame and scoop the excess ink up with the squeegee and place it in the back of the frame; you can quickly lift up the squeegee when you get close to the end of the frame and lift up the excess ink or you can stop when you pass the image area and lift the screen and do a flood stroke to push the excess ink back to the back of the screen. The last two are much more desirable than scooping the ink on the screen frame – although on jobs where the image is large you really will have no choice.
When Do You Flash Cure?
Never – if you can help it! The flash-cure unit has become the Band-Aid of the industry. People let the flash-cure unit make them a good printer by covering up thick ink, poor artwork overlays, too many strokes, etc. Almost anyone can get a good print by curing between each color – but with production rates in the low 30's (I mean 30 prints per hour) you will find this a hard business to make any money in. By simply using the correct mesh, right ink viscosity, good artwork and not too many strokes, you could print the same job wet-on-wet. Granted, there are many jobs where you have to flash-cure. Just don't let it be every job.
Keep the Finger Prints off the Shirts
Do you get ink everywhere? Maybe you cook dinner the same way. Try to clean as you go. This means keeping the ink containers, squeegee handles and screen frame edges clean. Get in the habit of not grabbing the squeegee too far down the handle. If you just can't keep ink off your hands then have a helper load and unload the shirts for you.
Here is a Summary of Right and Wrong
Wrong
(This way is typical of how many "experienced" printers print.)
- Use 110 mesh for everything.
- Use low tension screens.
- Print the print on-contact.
- Use the ink direct out of the container with no adjustment.
- Print with a number of strokes in each direction to "work" the ink into the garment.
- Flash cure every color.
- Have a VERY thick "bulletproof" print.20112016
Right
(This is how good printers print.)
- Use the proper mesh for the job. Higher mesh counts for multi-color work.
- Make sure the screens are tensioned properly.
- Print off-contact – even if it means using shims on the press.
- Reduce the ink if necessary to make it flow and penetrate better.
- Use just one stroke to make a clean print with minimal ink deposit.
- Flash-cure only if necessary.
- Have a soft print that has good detail and can be done in high production
It Ain't Brain Surgery
OK, it looks hard, but it isn't brain surgery. Just follow some simple and logical rules and you will find this business easy and very rewarding. Have fun with that first print!


